

Nano Banana 2.1 Storyboards: Keep a Character Consistent
To make a Nano Banana 2.1 storyboard with a consistent character, start with one approved character reference, write down the details that must stay fixed, and plan each shot before generating. Create and review one frame at a time. Compare every new frame with the original reference as well as the adjacent shot; a small change in each image can become a different character across the sequence.
You can use the Nano Banana 2.1 image editor for the individual frames, then arrange the downloaded images in your preferred presentation or layout tool. This guide uses a fictional courier delivering a parcel to a flower shop. The prompts are original examples to try, not a report of tested outputs.
Google's model documentation describes improvements to character consistency through repeated edits. Its model card still identifies imperfect character matching as a limitation. Treat consistency as something you check, rather than something a model name guarantees.
Define the character before defining the scenes
Choose a clear reference you have permission to use, or develop a fictional character image and approve it first. Look for a visible face, a readable silhouette, and clothing details you can inspect. If the identity is unclear in the source, a later prompt has little firm detail to preserve.
Write a small continuity sheet. For the fictional courier, it might look like this:
| Detail | Keep fixed across the sequence | What may change |
|---|---|---|
| Identity | Same apparent age, facial proportions, short dark curls | Expression and gaze |
| Costume | Mustard-yellow rain jacket, dark teal trousers | Natural folds caused by movement |
| Accessories | One red backpack | Its visible angle as the camera moves |
| Story prop | One plain cream parcel | Whether it is held or resting on the counter |
| Location | Same flower shop, green walls, wooden counter | Camera distance and framing |
Only include details you can actually see or deliberately specify. A written note about a concealed jacket patch will not supply the same visual evidence as a clear reference. If a missing feature matters, prepare a suitable additional view instead of adding more adjectives.
For reference-image selection and the role of each input, use the reference-image guide. This tutorial focuses on keeping several finished frames coherent, rather than assembling the largest possible reference set.
Give each frame one clear job
A storyboard needs a readable action across images, not just three attractive portraits. Decide what happens between frames and where the important objects end up.
| Frame | Story action | Suggested framing | Continuity check |
|---|---|---|---|
| Arrival | Courier enters the flower shop holding the parcel | Wide landscape view | Character, backpack, parcel, and shop entrance are identifiable |
| Handoff | Courier places the parcel on the wooden counter | Medium view | Same person and outfit; parcel moves from hands to counter |
| Reaction | Courier looks toward the shopkeeper after the handoff | Three-quarter close-up | Face remains recognizable; the parcel is no longer held |
Keep the camera on a consistent side of the action if you want the audience to follow movement smoothly. Use plain descriptions such as “the counter stays on the right side of the frame,” then check the image. Do not rely on a direction word alone to prove that the layout was followed.
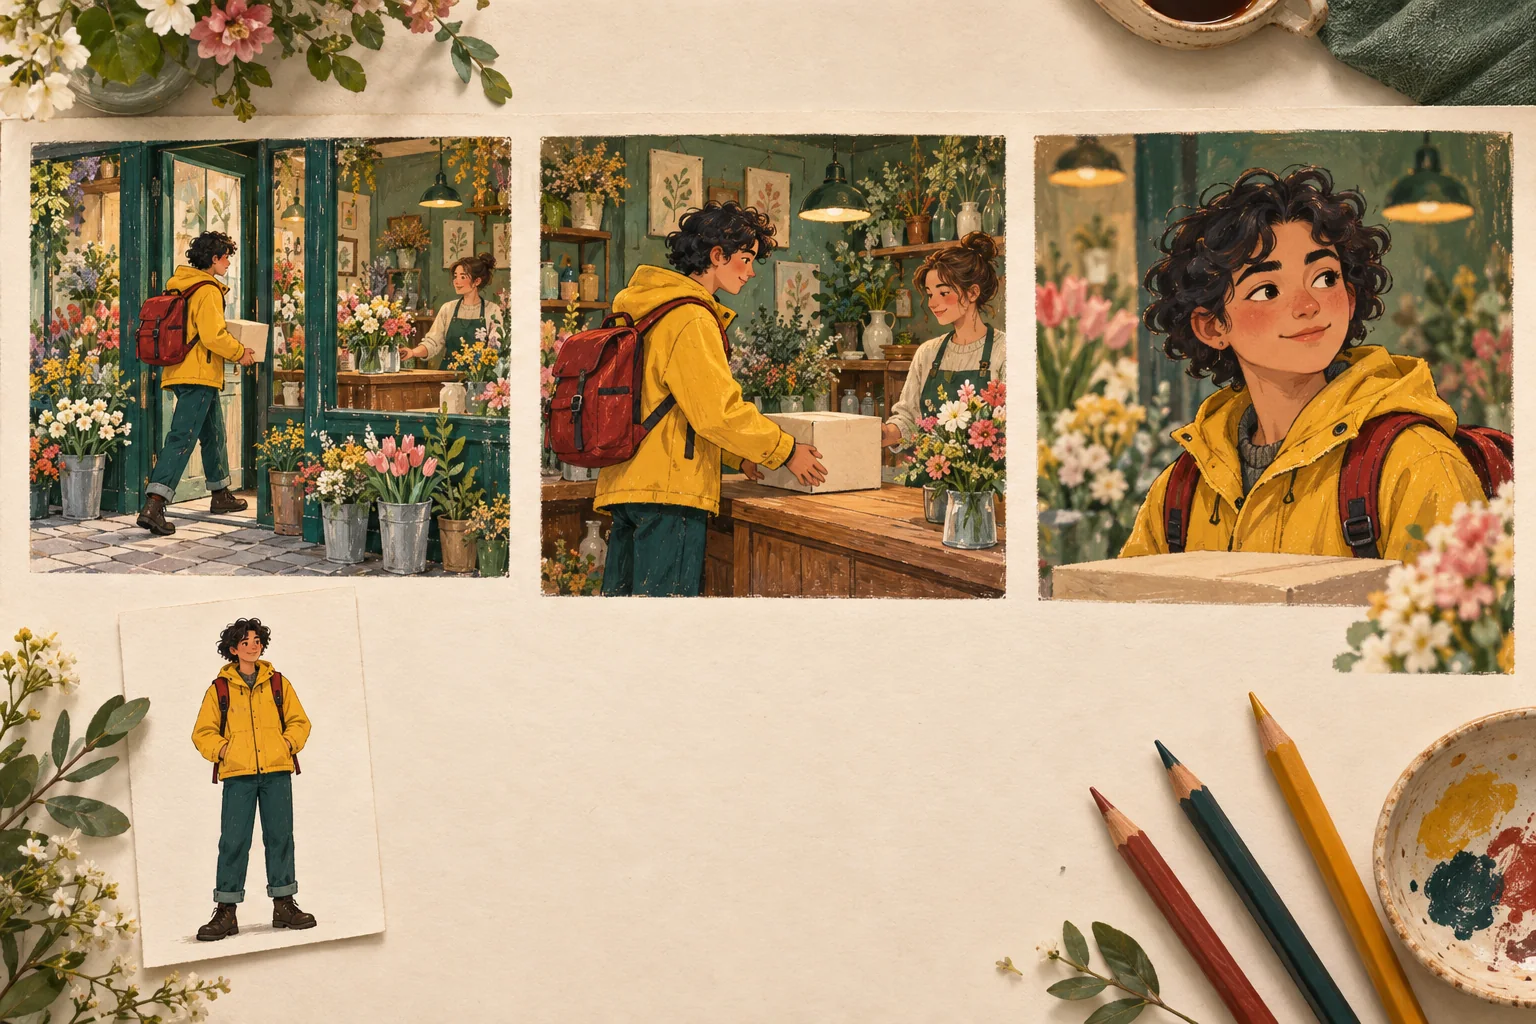
Original concept illustration for this workflow. It is not a Nano Banana 2.1 test sequence or evidence of model consistency.
Choose the final aspect ratio at the start. For this example, use 16:9 for all three frames. Changing ratio midway may change the framing and how much costume or setting is visible, making comparisons harder. A storyboard image is still a flat image; it is not an editable scene or an animation timeline.
Separate the shared instructions from the shot instructions
In the editor, select Nano Banana 2.1 and Image-to-Image. Upload the approved character reference. Keep a short block of identity and style instructions that you reuse without casually changing its wording.
For example:
Reference 1 defines the courier's identity and outfit. Keep the same facial proportions, apparent age, short dark curly hair, mustard-yellow rain jacket, dark teal trousers, and single red backpack. Use a natural editorial illustration style, muted greens, warm wood, soft daylight, and a 16:9 landscape composition. Include no captions, logos, or extra couriers.
Then add the instructions for the first frame:
Wide view inside a small flower shop looking toward the entrance. The courier is stepping through the open doorway holding one plain cream parcel with both hands. Green walls, a wooden counter on the right side of the image, and restrained flower displays establish the location. Keep the courier's face visible enough to recognize.
The shared block defines what should persist. The shot block defines what changes. If the first result needs a darker jacket or a different hairstyle, decide whether you are correcting an error or changing the character design. Update the approved reference and continuity sheet deliberately before generating the rest of the sequence.
Build the next frame from the approved anchor
Download the accepted first frame. For frame two, keep the original character reference as the identity anchor. If the shop arrangement needs visual guidance, you may also upload the accepted first frame and explicitly assign it a setting role:
Reference 1 controls the courier's identity and outfit. Reference 2 controls the flower shop's green walls, wooden counter, and daylight only. Create a medium view of the same courier placing the same cream parcel onto the counter. The parcel is supported by the counter as the hands release it. Keep one red backpack and the same yellow jacket. Do not copy the doorway pose from reference 2.
Reusing only the most recent output can carry an unnoticed error forward. Keeping the original anchor available gives you a stable comparison point. The website does not promise that a previous task's character, seed, or conversation state will automatically transfer to another generation: explicitly supply the references and instructions you need.
For frame three, retain the same identity and setting roles, then request the close-up and expression. State that the parcel has already been placed on the counter. Do not ask for three new actions, a new outfit, and a new location in the same correction.
Review the sequence in two passes
First compare each frame with the character reference. Inspect facial proportions, hairline, age, outfit color, backpack count, and recurring small details. A recognizable yellow coat alone does not establish that the person is the same.
Next place all three frames side by side and check the story. Is the parcel held before the handoff and on the counter afterward? Does the counter remain in a plausible location? Does a close-up introduce an accessory that was absent from the wide shot? Inspect hands and the way they contact the parcel, not just the face.
Keep a short acceptance note for each frame: “identity accepted; parcel position wrong” is more useful than “almost right.” A frame should pass both identity and story checks before it becomes a reference for the next image.
If a shot is visually appealing but introduces a different face, return to the original identity reference. If the pose refuses to change, simplify the request and separate the new pose from a major scene change. The model card notes that input pose can sometimes persist during editing; a stronger adjective is not a reliable fix.
Budget for accepted frames, including revisions
At the time of checking, this site's Nano Banana 2.1 option charges 2 credits per 1K image, 4 per 2K image, and 6 per 4K image. The editor's displayed charge is the reference before submitting. These site credits are separate from Google API prices.
Three 1K frame attempts cost 6 credits. One extra 1K correction brings that to 8. Three further 2K attempts add 12, giving a total of 20 credits. That is an example attempt budget, not a promise that 20 credits will produce three approved final frames. If you also need to develop the initial character reference, budget for that separately.
A new higher-resolution generation can alter details, so review it again. Increasing resolution does not repair a changed face or restore a missing prop by itself. See the pricing and credits guide for the broader rules.
Set a stopping rule: after one focused correction fails to resolve the same issue, reconsider the input and shot plan before paying for more variations. For general ignored instructions or upload problems, use the troubleshooting guide.
Assemble the storyboard after the frames pass
Download the approved frames and place them in order in a slide or layout document. Add frame numbers, action notes, and any timing or dialogue as editable text outside the generated artwork. This keeps production instructions easy to revise and avoids making the image model render paragraphs of small lettering.
Name the files clearly, keep the original character reference, and distinguish accepted frames from rejected variations. Review the sequence once more at the size your collaborators will see. If the project requires precise camera geometry, editable characters, or frame-accurate movement, use dedicated animation, 3D, or compositing tools for those stages.
Start with a small three-frame story in the image editor. Approve the character, define the action, and check each frame against both before extending the sequence.
Written by the Nano Banana 2.1 Team. Model documentation and site settings checked October 31, 2026. This is a suggested production workflow; no controlled model-quality benchmark was performed.